Thursday, June 30, 2011

The Next Food Network Star?

I watch way too much Food Network. And if I'm not watching Food Network, I'm watching the Cooking Channel. And if I'm not watching the Cooking Channel, I'm most likely watching The New Adventures of Old Christine.

...Don't judge. You know just as well as I do how hilariously ridiculous that show is.

The point is, I've been watching so many cooking shows that I decided I should have my own. And by my own, I mean another video post for my blog. Same thing.

For those of you who don't like cooking shows, I posted written directions with pictures also. Just for you!!

So let's get to it!! Hope your appetite is ready for this one.


Yeah...told you I pretended like I was on a cooking show. 


Quick & Easy Taco Salad with Vegetarian Taco "Meat" 

[Serves 3]

Ingredients:

Taco "Meat"
  • 3/4 cup cooked bulgar (rice or any other grain would also work)
  • 1/4 cup walnuts
  • 1/2 teaspoon cumin seeds
  • 1/8 teaspoon red chili powder
  • 1 1/2 tablespoons olive oil
  • ~1/8 teaspoon salt

Taco Salad
  • 3 whole wheat tortillas
  • 1 large stalk kale
  • 2-3 romaine lettuce leaves
  • 1 sweet potato
  • 1 large tomato
  • 1/8 red onion
  • 1 clove garlic
  • juice of 1/2 lemon
  • 1 teaspoon olive oil
  • 1/2 green chili
  • 1 teaspoon chopped cilantro (or more if desired)
  • salt/pepper
  • optional: shredded cheese

For the taco "meat", combine all ingredients in a blender. 


Empty it out into a small bowl and then mix in the salt.


To prepare the rest of the salad:

Chop the greens, put them in a bowl with olive oil, lemon juice, and about 1/2 minced garlic clove, and mix thoroughly with your hands. Set aside.


Wash the sweet potato, pierce a few times with a fork, and microwave it for 5 minutes. Let cool and then chop into cubes (with or without the peel). 

For the base of the salad, lightly spray or brush olive oil on three whole wheat tortillas, place on a baking sheet, and bake in a 350F oven while pre-heating for 5 minutes. Make sure to flip halfway through and check frequently to ensure the tortillas don't burn. Leave out for a few minutes--this is when they really begin to crisp up. 


To make the salsa, combine the chopped tomato, onion, the other 1/2 clove garlic, cilantro, salt, pepper, green chili, and lemon juice. 


To assemble, start with the crisp tortilla on a plate. Add the greens, the "meat", sweet potatoes, salsa, and top with shredded cheese.


So delicious, crispy, and healthy!! It contains pretty much every food group in every bite. 


So...now I want your opinion!

Cooking videos--are you a fan? Or do you prefer regular instructions with pictures?

TFG recommends: Have you ever wondered about the differences between the many types of yoga? This article gives a great description of each one.

Tuesday, June 28, 2011

Battle of the bulg(ar).

Today, I went to a strength training class. I was ready to pump some major iron.

So ready that I had protein pancake batter ready for me in the fridge when I returned from the class.

I don't know about you, but I think one of the reasons I like going to strength training classes is that I can look at myself in the mirror while lifting weights and admire my bulging muscles.

No? Just me? Okay. That's cool, too.

On second thought, I guess you can also freely stare at yourself while lifting weights in the weights section at the gym. But in my case, I'd be looking less at myself and more at the super big muscular guys next to me huffing and puffing with their 200 pound dumbbells. And I'd look a lot less cool.

Anyway. I went to this strength training class. Only to find that no weights were involved. In fact, it involved just a stability ball, a medicine ball, and some resistance bands.

Just. Pffft. Little did I know how ridiculously hard that class was going to be. In fact, I don't think stability balls and I get along very well. But this will change soon (hopefully).

On a completely different note, have you ever tried bulgar? It's a type of natural whole grain which has lots of beneficial properties. I picked some up a few weeks ago at Sprouts in the bulk bin and finally got around to cooking it. I had no idea what it would taste like, so I treated it sort of like pasta.


Bulgar Wheat with Broccoli Sauce

Ingredients:

  • 1 cup uncooked bulgar
  • 2 cups frozen broccoli florets
  • 1 1/2 cups chopped swiss chard
  • 5 teaspoons non-dairy milk (optional)
  • 1/4 cup chopped marinated artichokes
  • 2 tablespoons chopped cilantro
  • 1/2 teaspoon parsley
  • 1/2 teaspoon oregano (or Italian seasoning)
  • 2 cloves garlic
  • 1 1/2 tablespoons olive oil
  • 1/2 cup + 2 cups water (or sub vegetable broth for the 1/2 cup water)
  • salt & pepper to taste

This is what bulgar looks like:


To cook it, combine 1 cup bulgar and 2 cups water in a pot on the stove over high heat until the water boils. Then reduce the heat to medium-low until the water gets completely absorbed. The entire process takes less than 10 minutes--amazing!! It cooks really quickly.


For the sauce:

Heat the oil over medium in a large pot and add the garlic and broccoli. After the broccoli has thawed, add the swiss chard and salt. 


After the chard has wilted slightly, add the water (or broth), cilantro, and non-dairy milk (I used homemade hemp milk--fancy! I know). Turn the heat to low. Then, either empty the contents into a blender and blend until mostly smooth, or use an immersion blender.


I used an immersion blender, but I found that the contents preferred to splatter all over the place. So I'd suggest perhaps adding a bit more water or vegetable broth to allow for easier blending with the immersion blender. Either way, broccoli is one of those stubborn vegetables that does not like to be blended.

Once the sauce is somewhat smooth (it's nice to still have some texture to it), add the marinated artichokes, oregano, parsley, pepper, and more salt if necessary.


Combine the sauce with the bulgar and serve with a side salad.


Yes, those are onions in the salad. I didn't have a choice, the only salad-friendly vegetables in the fridge were romaine, tomatoes, and onions. 

I forgot that one of the reasons why I despise onions is because they make you cry when they are cut. What the heck kind of vegetable does that!? It's almost like it doesn't want to be eaten. Fine. I won't eat you then.

I'll eat this delicious bulgar and broccoli sauce instead!!


With a sprinkle of crushed red pepper flakes, of course!

Sunday, June 26, 2011

Dessert club.

This is going to change your life. Well, at least your dessert-related life.

I hardly ever post about the desserts I eat or make. This by no means represents my real life dessert consumption. By the by.

Anyway, Deepa sent me this recipe and suggested we make it because 1) It's tiramisu and tiramisu is fancy; 2) It's an easy recipe; and 3) We both have out of control sweet teeth.

We did what most cool kids our age do on Saturday nights and went to the grocery store to gather the ingredients. 

...Apparently stores don't carry ladyfingers. And apparently people who work at grocery stores don't even know what ladyfingers are. What's that about?

So we winged it. And then also spontaneously grabbed a can of sweetened condensed milk. Best decision ever. 


5-Minute Tiramisu

Ingredients:
  • 6 slices angel food cake, 1/2 inch thick
  • 1/2 cup part-skim ricotta cheese
  • 1/4 teaspoon vanilla extract
  • 1/2 teaspoon ground cinnamon
  • 2 tablespoons fat-free sweetened condensed milk
  • 2 tablespoons brewed coffee (any kind)
  • 2 teaspoons melted dark chocolate

Angel food cake. I could eat this by the handful. Literally, this stuff has no body and hence it is quite possible to just form it into shapes.


Mix the ricotta, vanilla, and cinnamon in a bowl.


Place one slice of cake on a plate and pour 1/2 tablespoon of coffee onto the slice.


Let the coffee soak into the cake. Then spread some of the ricotta mixture on top.


Place another slice of cake on top. Pour coffee on top of that slice, then drizzle with condensed milk.


Place another slice on top, pour the rest of the coffee, spread ricotta and and top with more condensed milk. Finish by drizzling melted chocolate on top. 


You can make this with 2, 3, or even 4 slices of cake (if you're feeling a little crazy) and be as spontaneous as you feel like with the layers. 


Either way, this tastes so gourmet, and no one would ever know it took you 5 minutes to make it. And if it is possible for this to get any better, it's super light and definitely one of those desserts you don't have to feel guilty about eating!!

TFG recommends: 10 Exercise Myths

Saturday, June 25, 2011

Pass the fortune cookie.

Have you ever eaten at a restaurant and thought to yourself "I wish I could make this dish. And not feel 10 inches wider after eating it"?

Story of my life.

I'm here to tell you that all of the above is possible. Especially eliminating the feeling of slipping into a food coma immediately after eating a hefty meal.

And if you're in the mood for Chinese today, you're in luck. If you're not in the mood...that's just unfortunate, because I have not one, but two recipes for you!!

Yeah. I went a little overboard on the gourmet while cooking this yesterday. But I promise it's super easy and every single one of you can make these dishes.


Eggplant with Garlic Sauce

Serves 4

Ingredients:
  • 3 long eggplants
  • 2 cloves garlic, minced
  • 2 tablespoons soy sauce
  • 1/2 teaspoon whole wheat flour
  • 1/4 teaspoon chili paste
  • 1/2 cup water
  • 2 1/2 tablespoons canola oil

Chop the eggplant and place into a bowl. Sprinkle a generous amount of salt, toss the eggplant pieces, and let sit for a few minutes.


The salt will help release water from the eggplant.

In the mean time, prepare the sauce. In a small bowl, combine the soy sauce and flour. Whisk the flour until dissolved, then add the water, minced garlic, and chili paste.


Check back on the eggplant. Empty the pieces onto a towel and dab off the water and salt.

In a skillet or wok, heat oil over medium and add the eggplant.


Turn the heat down slightly and lightly toss the eggplant until tender. Pour the sauce over the eggplant.


If necessary, add about 1/4 cup more water. Stir to coat, and cover the skillet.

The eggplant should absorb the liquid and the sauce should be thick. This takes between 7-10 minutes over low heat.


Try not to eat this out of the pot. (I couldn't help myself).

It's pretty delicious if I say so myself.

Now for recipe #2!

Gingery Tempeh Stir Fry

Serves 4

Ingredients:
  • 1 block tempeh*
  • 1 teaspoon chopped ginger 
  • 1/2 red bell pepper, chopped
  • 2 carrots, peeled and chopped
  • 1 cup chopped broccoli
  • 1 package stir fry mix**
  • 1/2 cup water
  • 1 1/2 tablespoons canola oil

Notes:

*Some natural food stores don't keep tempeh in stock. If this is the case, I've found that it's possible to ask the store to specially order some for you. It doesn't hurt to ask, and it shouldn't cost anymore than usual! For this recipe, I used WestSoy 5-Grain Tempeh.

**I used this package of stir fry mix from an Asian grocery store:


---

Chop the tempeh into bite-sized cubes.


Prepare the stir fry sauce according to package directions. Place all of the tempeh cubes into the bowl and allow to marinate in the sauce for 5-10 minutes. 

In a large skillet, heat the oil over medium and add the ginger. Immediately, add the tempeh without the sauce. I fished the cubes out with a fork. A slotted spoon would probably be easier.

Lightly stir the tempeh around, making sure they are cooking evenly. Add the rest of the vegetables to the skillet, and then pour the sauce over the entire mixture.


Cover and let cook on the stove over medium-low heat. After 5 minutes turn the heat off and stir the mixture. Let cook over the remnant heat. 

Serve with brown rice and more chili paste (if you like to sweat while you eat).


You'll never order Chinese take-out again. 

Okay, a girl can dream. But I do hope that you make these dishes. They don't even taste that healthy! 

Okay, you caught me again. Maybe the tempeh could throw someone off. But you could easily substitute tofu for tempeh to make it less "healthy" but really, it will still be healthy. 


You just can't escape me.

I've also decided to add some reading material to the end of my posts from now on. I promise it's not boring stuff!!

Especially because I've really been slacking when it comes to discussing fitness-related matters. Woops. So today, I'm making up for that...


PS: Have you checked out the new TFG Mobile page?

Friday, June 24, 2011

TFG goes mobile!

I have exciting news for you...yes, YOU! Especially if you think being on the phone > being on the computer.

The TFG Android app is now available (for free!) on the TFG Mobile page. For those of you with Android, it would be great if you could try it and let me know what you think!

Coming soon: text for ingredient lists for your favorite recipes. Keep your eyes peeled for that one--it'll especially be useful to those of you who get to the store and forget what items to buy!!

No recipe update today, but don't worry. I'll be back tomorrow with a healthified Chinese food recipe!!

Thursday, June 23, 2011

Everyday TFG.

I gave artichokes a second chance.

Only because I had two left to use up after my artichoke shopping spree. It took me one week to get over the traumatizing events that were last week's artichoke adventures.

This time, I made a fancier meal. I figured I should go all out if I'm cutting and cooking two of those fuzzy things.

To change things up, I followed Giada's instructions on how to cook an artichoke and also based my recipe on hers. But if you are a visual person like me, you are in luck, since I took a few lots of pictures to keep you engaged!


Stuffed Artichokes with Quinoa

Ingredients:
  • 2 artichokes
  • 1 lemon
  • 1 cup uncooked quinoa
  • 3 small tomatoes
  • 1 cup chopped swiss chard (spinach/kale will also work)
  • 1 clove garlic
  • 1 1/2 tablespoons olive oil
  • 1/2 teaspoon oregano
  • 1/2 teaspoon parsley
  • 1/4 teaspoon salt/pepper
  • optional: red wine vinegar and/or balsamic vinegar

To prepare the artichokes: rinse and cut off all but 1 inch off of the stem. Peel all of the dark green petals off until the yellow-ish ones are left.


Cut the artichokes into halves and then into quarters.


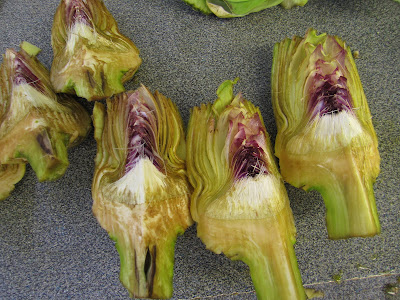
With all of the patience you possess, scoop out the fuzzy portion and while you're at it, remove all the purple petals.


Prepare a large pot full of water on the stove and squeeze the juice of 1 lemon into it. Then throw the squeezed lemon halves into the pot of water. Do not heat just yet.

Put all of the artichoke quarters into the pot of water, turn the stove on high, and allow the water to boil. Cover the pot.


Cook for about 35-40 minutes, or until the artichokes are tender.

While the artichokes cook, cook the quinoa according to directions. Empty the cooked quinoa into a bowl, and prepare another medium-sized pot on the stove with olive oil and the chopped garlic.

Heat over medium-low, and add the swiss chard and tomatoes.


Add the cooked quinoa and stir.


Season with salt, pepper, oregano, parsley, and a splash of red wine vinegar.

And now, let's put it all together!!

When the artichokes are ready, take them out of the pot and allow them to cool. 

Optional: pour some balsamic vinegar over the artichokes for some extra flavor.

Scoop some quinoa mixture onto the artichokes and serve!


Seriously, make this if you want to impress someone. It works wonders. (Just assuming).


Also, if you were curious, when you try to eat this, the prettiness of the meal definitely disappears. In case you assumed otherwise. And...I did. Good thing I wasn't trying to impress anyone!! Enjoy!!
Wednesday, June 22, 2011

Snackage.

Does anyone else have a serious snacking problem during the summer?

Wait, don't answer that. I know you do. Especially if you have a sweet tooth like me!

Earlier this week, I made the granola bars I posted about a couple of weeks ago. And this time, I was lucky enough to score some alone time with them for a quick photo shoot before they disappeared in 2.5 minutes.


This time I added less sugar/butter and omitted the chocolate chips in an attempt to make them healthier. They were still super tasty and a little more crunchy. I actually preferred them that way!


Today, I tried a completely different granola bar approach. A ridiculously healthy approach. And yet, it still satisfied my sweet tooth. *Gasp*

Too good to be true.


Crunchy Chocolate Chia Seed Bars

Inspired by Emma's recipe

Ingredients:
  • 1/2 cup uncooked oats
  • 1/3 cup Grape Nuts cereal
  • 2 tablespoons chia seeds
  • 1/3 cup water
  • 1 tablespoon brown rice syrup (honey/maple syrup/agave will also work)
  • 1/8 cup chocolate chips 

In a small bowl, stir together the chia seeds and water. Allow it to set for a few minutes until it becomes a gel-like substance. This still amazes me.


Set the chia gel aside.

Either using a potato masher (like I did) or a rolling pin and ziploc bag, crush the Grape Nuts--not to a powder--but just roughly to a finer consistency. Pour the crushed cereal into a bowl and add the oats. Add the chia gel and stir. Then add the brown rice syrup.


Stir until the mixture is as uniform as possible. It's tricky considering the chia gel is very stubborn!!

Press the mixture onto a baking sheet (either greased or lined with foil).


Press the chocolate chips into the 'batter.'


Bake at 200F for 10-15 minutes. 

Allow to cool before cutting into it!


These bars have the best texture!! A combination of chewy, crunchy, light, and dense. Strange, but true. Oh, and chocolatey!


Chia seeds are the best for keeping you full!! What else could you ask for in a snack?! Actually, don't answer that.

What kinds of snacks do you grab during the day? Any suggestions on how to get this crazy snack craving under control?!